
I’ve helped hundreds of people turn their homes into spaces they actually want to spend time in.
You probably have a Pinterest board full of rooms you love. But when you look around your own house, you can’t figure out how to get from here to there.
Here’s the thing: good design isn’t about having a big budget or some natural talent. It’s about following a process that works.
I put together this home interior guide mrshomint to walk you through exactly that. Room by room. Step by step.
You’ll learn how to plan a space that looks good and actually works for how you live. I’ll show you where to start (it’s not where most people think) and how to make decisions that won’t leave you second-guessing yourself six months later.
This isn’t theory. It’s the same framework I use every time I design a room.
By the end of this guide, you’ll know how to choose colors that work together, arrange furniture that makes sense, and pull together a finished space without blowing your budget.
No design degree required. Just a willingness to follow the steps.
Step 1: Discover Your Personal Design Style
You’ve probably scrolled through a hundred Instagram posts tagged “modern farmhouse” or “coastal boho” and thought they all look the same.
That’s because they are.
Here’s what most people get wrong about finding their style. They think they need to pick a label and stick with it. Like choosing a Hogwarts house but for your living room.
But labels don’t tell you much. They’re just shorthand for a bunch of design choices someone else made.
I want you to think differently.
Instead of asking “Am I a minimalist or a maximalist?” ask yourself how you want to feel when you walk into your space. Do you want calm? Energy? A place that wraps around you like your favorite sweater?
That’s where you start.
Grab your phone and open Pinterest. Or flip through magazines if you’re old school like me. Save everything that makes you stop scrolling. Don’t overthink it. Just collect what catches your eye.
After a week or two, look at what you’ve gathered. You’ll start seeing patterns. Maybe you keep saving rooms with warm wood tones. Or spaces with tons of natural light. Or that one shade of blue that shows up everywhere.
This is your mood board. And it’s way more useful than any style quiz.
Now ask yourself some real questions. What happens in this room most? Is it where your kids do homework? Where you unwind after work? Who actually uses this space?
Write down three to five words that describe your ideal atmosphere. Not design words. Feeling words.
Once you know how you want to feel, you can start picking the pieces that’ll get you there. Look at your mood board again. What materials keep showing up? Woods? Metals? Stone?
What about textures? I’m talking velvet, linen, leather. The stuff you want to touch.
This is how you build what I call your style signature. It’s not about fitting into someone else’s category. It’s about knowing what works for you and why.
And if you’re drawn to clean lines and natural materials, you might find yourself leaning toward scandinavian interior design mrshomint without even realizing it.
The benefit? You stop second guessing every purchase. You walk into a store and know instantly if something belongs in your space or not. That’s the real value of doing this work upfront with home interior guide mrshomint.
Step 2: Plan Your Space for Function and Flow
I learned this the hard way when I moved into my first apartment.
I spent an entire Saturday rearranging my living room. Moved the couch three times. Dragged the coffee table back and forth until my arms hurt. By evening, I was exhausted and the room still felt off.
The problem? I never measured anything first.
Measure Everything
Pull out your tape measure before you move a single piece of furniture.
I’m talking about the whole room. Length and width, sure. But also those windows, doorways, and that weird alcove you’re not sure what to do with yet.
Write it all down. Trust me, you’ll forget the exact width of that window the second you walk into another room.
Create a Floor Plan
You don’t need fancy software for this.
Graph paper works great. One square equals one foot, and you can sketch out different layouts until something clicks. (I still use this method because it’s fast and I can do it while sitting on my couch.)
If you prefer apps, there are free options that let you drag furniture around on your phone. The home interior guide mrshomint approach makes this step simple, so you’re not guessing where things should go.
The Importance of Traffic Flow
Walk through your room right now.
Notice where you naturally move? Those are your pathways, and you need to keep them clear.
I see this mistake all the time. Someone places a beautiful chair right in the path between the door and the kitchen. It looks good on paper but becomes annoying in real life.
Leave at least 30 inches for main walkways. Your future self will thank you when you’re not squeezing past furniture with a cup of coffee.
Establish Functional Zones
Big rooms need structure.
Think about how you actually use the space. Do you work from home? You need a workspace zone. Like reading before bed? Carve out a spot for that.
Rugs are your best friend here. They define areas without building walls. A rug under your dining table says “this is where we eat” while another one anchors your couch and says “this is where we relax.”
Furniture works too. A bookshelf can separate your office area from your living space better than you’d think.
Step 3: Build Your Perfect Color Palette
You’ve probably seen rooms that just feel right.
The colors work together without screaming for attention. Nothing clashes. Nothing feels off.
Here’s what most design articles won’t tell you. Those perfect color schemes aren’t accidents, but they’re also not as complicated as interior designers want you to believe.
I’m going to show you exactly how to build a palette that works.
Start with the 60-30-10 rule. It’s simple math that actually makes sense. Your dominant color covers about 60% of the room (think walls and large furniture). Your secondary color takes up 30% (upholstery, curtains, bedding). Your accent color gets the final 10% (pillows, artwork, small decor).
Some people say this rule is too rigid. That it stifles creativity and makes every room look formulaic.
But here’s what they’re missing. The rule gives you a framework so you don’t end up with five competing colors fighting for attention. You can still be creative within it.
Now, where do you actually start?
Look around your room right now. What’s the one thing you absolutely love and won’t replace? Maybe it’s a painting your grandmother gave you. Maybe it’s that vintage rug you found at an estate sale.
Pull your colors from that piece. Use your phone camera to capture it, then match paint chips at the store. This approach gives you a built-in starting point instead of staring at 3,000 paint swatches like a deer in headlights.
Here’s where most people mess up though.
Undertones will make or break your palette. That beige paint might look warm in the store but turn cold and gray on your wall because it has blue undertones. Your cream sofa might suddenly look dingy next to it.
Cool undertones lean blue or green. Warm undertones lean yellow or red. Neutral undertones sit somewhere in between (though truly neutral colors are rare).
The home interior guide mrshomint recommends this test: hold your paint sample next to your existing pieces in natural light. Do they play nice together or does something feel off?
Which brings me to the most important step.
Test your paint samples before you commit. I mean really test them.
- Paint large swatches on at least two different walls
- Observe them in morning light
- Check again in afternoon light
- Look one more time at night with your lamps on
That gorgeous sage green might turn muddy on your north-facing wall. That crisp white might glow pink at sunset.
(I once painted an entire bedroom before realizing the color looked completely different after 3pm. Had to repaint the whole thing.)
Light changes everything. Give yourself three days minimum to live with those samples before buying five gallons of paint.
Your future self will thank you.
Step 4: Layering Furniture, Lighting, and Textures
You’ve got your color palette down. Your layout makes sense.
Now comes the part where your room actually starts to feel like home.
I’m talking about the layers. The furniture that grounds you and the pieces that make you smile when you walk in. The lighting that shifts your mood without you even noticing. The textures that beg you to touch them.
This is where things get personal. And honestly, where I see people second-guess themselves the most.
Start with Your Anchors
Your sofa. Your bed. Your dining table.
These are your foundation pieces. The ones you build everything else around. They’re usually your biggest investment and they set the tone for what comes next.
But here’s where it gets tricky. Some designers will tell you to buy the best quality you can afford for these pieces. Others say to save money here and splurge on accents.
I’ll be straight with you. I’m not entirely sure there’s one right answer. It depends on how you live and what matters to you.
What I do know is this. Your anchor pieces should work hard. They need to fit your space and handle daily life without falling apart.
Once those are in place, you add the personality with accent chairs, side tables, and ottomans. The stuff that makes your space yours and not just another showroom.
The Lighting Question
Most rooms need three types of lighting. Ambient for overall brightness. Task for reading or cooking. Accent for highlighting what you love.
That’s the rule anyway.
But I’ve walked into plenty of beautiful rooms that break this rule completely. Maybe they only have two layers. Maybe they rely heavily on natural light during the day and get moody at night.
The truth is, lighting is part science and part feel. You can learn how to create mood with light fixtures mrshomint style, but you still need to trust what works in your actual space.
I start with ambient. Usually a ceiling fixture or recessed lights. Then I add task lighting where I actually do things. Reading lamps. Under-cabinet lights in the kitchen.
Accent lighting comes last. It’s optional but it makes a difference when you want to draw eyes to artwork or architecture.
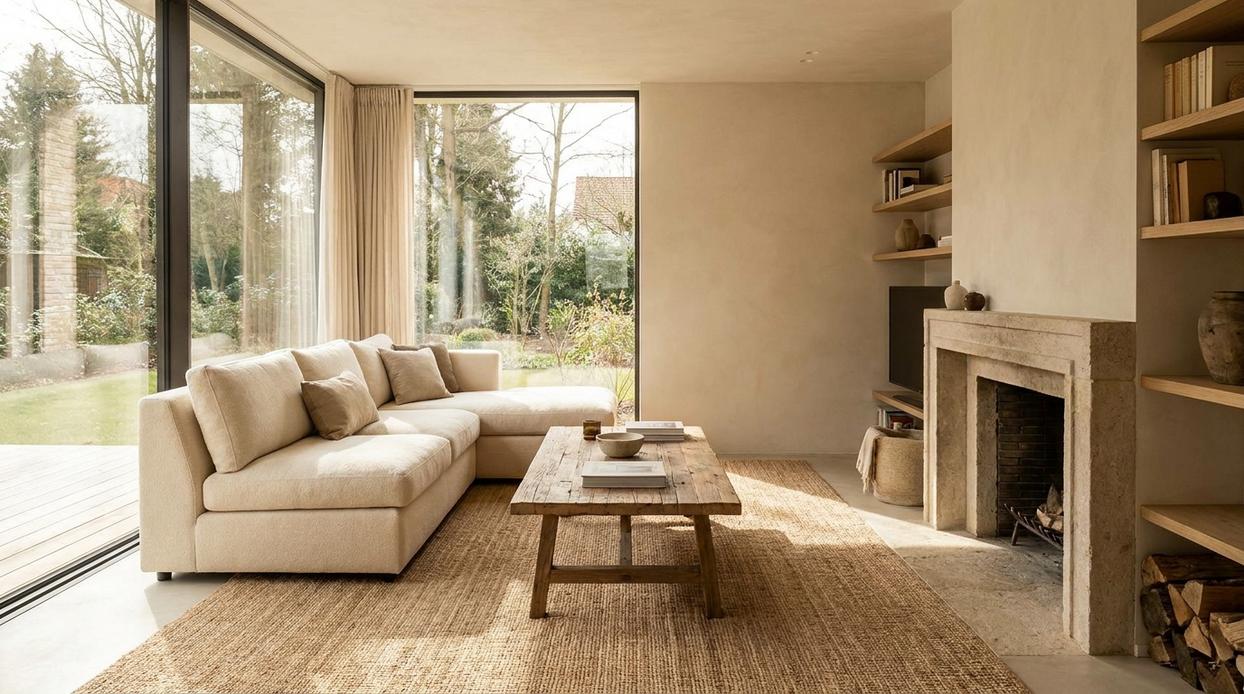
Texture is Everything
This is where your home interior guide mrshomint approach really pays off.
A room with one texture feels flat. Even if the colors are perfect.
I layer smooth with rough. Soft with hard. A leather sofa gets a chunky knit throw. Linen curtains hang next to a jute rug. Wood furniture sits on a plush carpet.
You don’t need to overthink it. Just mix things up.
Run your hand over surfaces when you shop. If everything feels the same, you’re missing an opportunity.
The Final Layer
Window treatments frame your view and control light. Artwork fills your walls with meaning. Plants bring life into dead corners.
Then there are the objects that tell your story. The ones guests ask about.
These finishing touches take time to collect. You can’t rush them and you shouldn’t force them.
Some rooms never feel quite done. And maybe that’s okay. Spaces evolve as you do.
Bringing Your Vision to Life
You now have a complete framework to tackle any interior design project in your home.
Four steps. That’s all it takes.
I know how overwhelming it feels when you’re staring at a blank room. You want it to look good but you don’t know where to start.
That feeling is gone now. You have a clear process that works.
The home interior guide mrshomint breaks it down in order: style, space, color, and layers. Each step builds on the last one. You’re not guessing anymore.
This approach works because it gives you structure without killing your creativity. You make decisions in the right sequence and everything falls into place.
Here’s what you should do next: Start small. Pick one room in your house. Begin with Step 1 and work your way through.
Don’t try to redesign your entire home at once. Take it one space at a time and enjoy the process.
Your home should feel like yours. Now you know how to make that happen.